

IV) Power and performance measurement
You hqve to perform your measurements on the flattest and smoothest road possible (this is the most important), in a straight line, with as little wind as possible, and with the tires warm and well inflated (manufacturer pressure).
It is also important to perform your measurements in both directions of the road (and on the same portion) and ask PerfectPower to average them in order to eliminate the very real influence of the road slope and the wind on the results! All info on this subject in the FAQ (question 5) (link coming soon).
Now here are the 7 types of measurements that can be carried out with PerfectPower:
- 4 main and stored in memory: Power, Accelerations, Runs flying start, and Braking
- 3 secondaries: Speed, Rev calibration, and Losses measurement
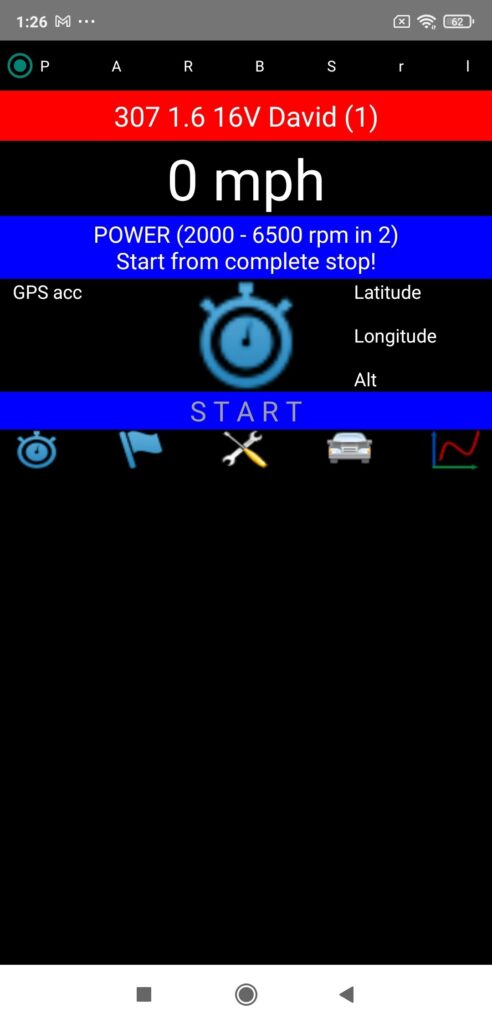
1) Power
Go to the Perfs screen (the home screen), and at the very top of the screen, select:
- The P tab (= Power), the 1st
- The car you want to use (short click to scroll through them, long click to select the one you want)
Note: Selecting the car results in the color of its action bar changing from blue to red.
A) Mode 1 (Accelerometer + GPS)
- 1) Put the car to a complete stop, foot on the brake, disengaged and 1st gear engaged (START & blue bar)
- 2) Press the chrono located in the middle of the screen (WAIT & red bar & accelerometer calibration 1 s)
- 3) Wait for the GO! signal to start (GO! & green bar)
- 4) Start normally in 1st gear, the measurement is started automatically (RUNNING… & white bar)
- 5) Shift up to the selected gear (2nd or 3rd), making sure to fall back on this gear below the selected min rev
- 6) Then accelerate fully (wide open throttle) up to the selected max rev (no more, no less)
- 7) Once this max rev is reached, disengage (manual gearbox) or simply take your foot off the accelerator (automatic gearbox) then let the car slow down for at least 3 s, after which the measurement will be stopped automatically (ENDED & blue bar)
- 8) A measurement report is then displayed in the lower part of the screen, which will give you the essential information of your measurement (power, torque, quality report). Once read, press the chrono, PerfectPower will re-initialize for a new measurement (START & blue bar)
Note 1 (step 5): A tip to be sure to fall back below the selected min rev on the selected gear is to shift up the gears at the selected min rev! Here is an example:
Selected gear = 3 & Selected min rev = 2000 rpm
Shift up 1st and 2nd at 2000 rpm, you will FORCEDLY fall back below 2000 rpm in 3rd!
Note 2 (step 7): You can also brake a little to force the measurement to stop, but do it only after a natural slowing down phase of the car (freewheel or foot off the accelerator) of at least 1 s. What you should in all cases avoid to do is to brake abruptly as soon as the max rev is reached!
Note 3 (step 7): In all cases, the measurement will stop automatically at the first of the following three conditions encountered: 3 consecutive s of deceleration, significant braking, or 30 s of measurement.
IMPORTANT 1: In the “Calculation of losses by measure in coastdown” mode, it is obviously IMPERATIVE to remain in freewheel for the whole losses measurement duration configured in Setup & Power (min 5 s and max 15 s)!
IMPORTANT 2: You must not continue to accelerate in the higher gear once the max rev has been reached on the selected gear, otherwise the application will believe that the measurement is not finished and will continue to record it! This reflex is very common among new users!
B) Mode 2 (GPS only)
- 1) Stabilize the car at an engine speed 200 rpm lower than the selected min rev on the selected gear (START & blue bar)
- 2) Press the chrono located in the middle of the screen (GO! & green bar)
- 3) Accelerate fully (wide open throttle) up to the selected max rev (no more, no less), the measurement is started automatically when the speed corresponding to the selected min rev is crossed (RUNNING… & white bar)
- 4) Once this max rev is reached, disengage (manual gearbox) or simply take your foot off the accelerator (automatic gearbox) then let the car slow down for at least 3 s, after which the measurement will be stopped automatically (ENDED & blue bar)
- 5) A measurement report is then displayed in the lower part of the screen, which will give you the essential information of your measurement (power, torque, quality report). Once read, press the chrono, PerfectPower will re-initialize for a new measurement (START & blue bar)
Note (step 4): In all cases, the measurement will stop automatically at the first of the following two conditions encountered: 3 consecutive s of deceleration, or 30 s of measurement.
IMPORTANT 1: In the “Calculation of losses by measure in coastdown” mode, it is obviously IMPERATIVE to remain in freewheel for the whole losses measurement duration configured in Setup & Power (min 5 s and max 15 s)!
IMPORTANT 2: You must not continue to accelerate in the higher gear once the max rev has been reached on the selected gear, otherwise the application will believe that the measurement is not finished and will continue to record it! This reflex is very common among new users!
Tutorial & Demonstration Videos
A tutorial (French / English of your choice) and 5 demonstration videos are provided to you in Videos section!
Tips & Tricks
N° 1
Use of the correction function of results on max speed in mode 1 in case of poor GPS reception (or even failure of this one!)
Always stop your measurements at the same max rev (the one selected in the Car sheet): not only is this the normal measurement protocol, but it also allows you to detect AND above all correct a weakness in GPS reception! Indeed:
1) When you do not use an external GPS:
- The max speed of all your measurements must be within a maximum range of 1 km/h (example: 100 km/h real ==> all speeds between 99.5 and 100.5 km/h)
- The max power in a same measurement direction must be within a maximum range of 2% (example: 100 hp real ==> all powers between 99 and 101 hp)
2) When you use an external GPS of 10 Hz minimum:
- The max speed of all your measurements must be within a maximum range of 0.5 km/h (example: 100 km/h real ==> all speeds between 99.75 and 100.25 km/h)
- The max power in a same measurement direction must be within a maximum range of 1% (example: 100 hp real ==> all powers between 99.5 and 100.5 hp)
If your measurements do not fall within these speed and power ranges, this is a sure sign that your GPS reception is weak, but be aware that in this case, PerfectPower has an exceptionally effective function for correcting the results based on the actual max speed at the end of the measurement! To use it, follow the instructions given in chapter VII-3 dedicated to this function, thank you.
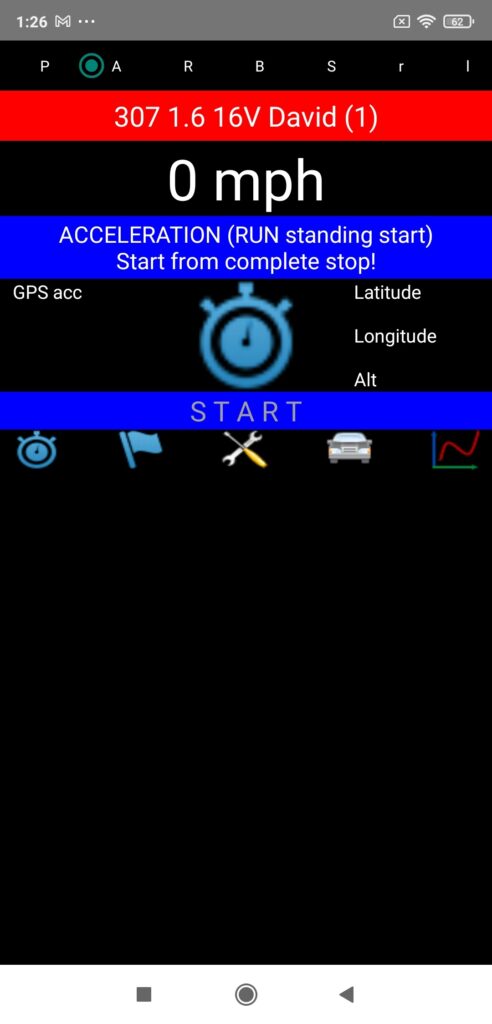
2) Accelerations
Go to the Perfs screen (the home screen), and at the very top of the screen, select:
- The A tab (= Accelerations), the 2nd
- The car you want to use (short click to scroll through them, long click to select the one you want)
Note: Selecting the car results in the color of its action bar changing from blue to red.
A) Mode 1 (Accelerometer + GPS)
- 1) Put the car to a complete stop, foot on the brake, disengaged and 1st gear engaged (START & blue bar)
- 2) Press the chrono located in the middle of the screen (WAIT & red bar & accelerometer calibration 1 s)
- 3) Wait for the GO! signal to start (GO! & green bar)
- 4) Accelerate fully, the measurement is started automatically (RUNNING… & white bar)
- 5) Once the measurement is finished (it is obviously you who decide when it is finished), disengage (manual gearbox) or simply take your foot off the accelerator (automatic gearbox) then let the car slow down for at least 3 s, after which the measurement will be stopped automatically (ENDED & blue bar)
- 6) A measurement report is then displayed in the lower part of the screen, which will give you the essential information of your measurement (acceleration time, quality report). Once read, press the chrono, PerfectPower will re-initialize for a new measurement (START & blue bar)
Note 1 (step 5): You can also brake a little to force the measurement to stop, but do it only after a natural slowing down phase of the car (freewheel or foot off the accelerator) of at least 1 s. What you should in all cases avoid to do is to brake abruptly as soon as the measurement is finished!
Note 2 (step 5): In all cases, the measurement will stop automatically at the first of the following three conditions encountered: 3 consecutive s of deceleration, significant braking, or 60 s of measurement.
IMPORTANT: If you have activated the acceleration measurement stop mode on speed in Setup & Accelerations, the measurement will stop automatically as soon as the configured measurement end speed is reached!
B) Mode 2 (GPS only)
- 1) Put the car to a complete stop, foot on the brake, disengaged and 1st gear engaged (START & blue bar)
- 2) Press the chrono located in the middle of the screen (GO! & green bar)
- 3) Accelerate fully, the measurement is started automatically (RUNNING… & white bar)
- 4) Once the measurement is finished (it is obviously you who decide when it is finished), disengage (manual gearbox) or simply take your foot off the accelerator (automatic gearbox) then let the car slow down for at least 3 s, after which the measurement will be stopped automatically (ENDED & blue bar)
- 5) A measurement report is then displayed in the lower part of the screen, which will give you the essential information of your measurement (acceleration time, quality report). Once read, press the chrono, PerfectPower will re-initialize for a new measurement (START & blue bar)
Note (step 4): In all cases, the measurement will stop automatically at the first of the following two conditions encountered: 3 consecutive s of deceleration, or 60 s of measurement.
IMPORTANT: If you have activated the acceleration measurement stop mode on speed in Setup & Accelerations, the measurement will stop automatically as soon as the configured measurement end speed is reached!
3) Runs flying start
Go to the Perfs screen (the home screen), and at the very top of the screen, select:
- The R tab (= Runs flying start), the 3rd
- The car you want to use (short click to scroll through them, long click to select the one you want)
Note: Selecting the car results in the color of its action bar changing from blue to red.
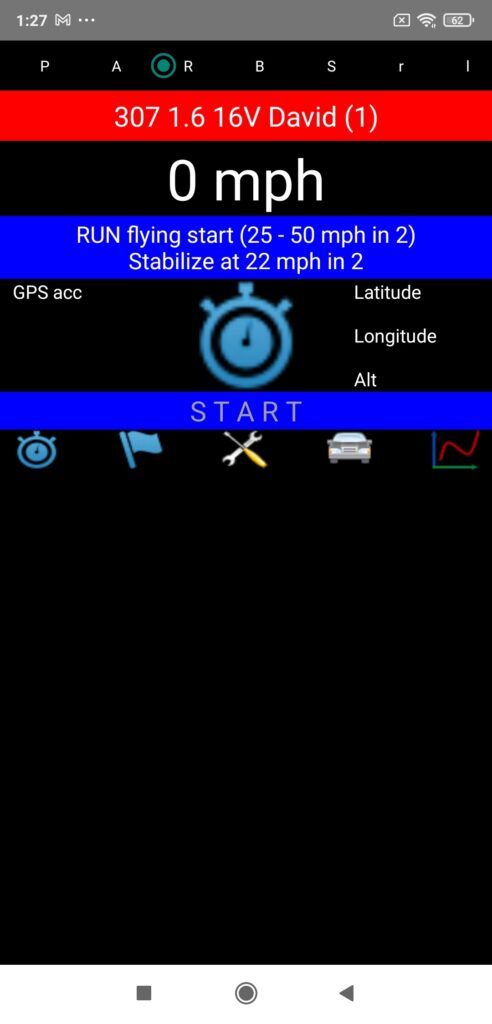
- 1) Stabilize the car at a real speed (GPS speed displayed at the top of the Perfs screen) 5 km/h (3 mph) lower than the selected start speed and on the selected gear (START & blue bar)
- 2) Press the chrono located in the middle of the screen (GO! & green bar)
- 3) Accelerate fully, PerfectPower automatically starts the measurement when the selected start speed is reached (RUNNING… & white bar)
- 4) Once the selected end speed is reached, PerfectPower automatically stops the measurement (ENDED & blue bar)
- 5) A measurement report is then displayed in the lower part of the screen, which will give you the essential information of your measurement (run time). Once read, press the chrono, PerfectPower will re-initialize for a new measurement (START & blue bar)
4) Braking
Go to the Perfs screen (the home screen), and at the very top of the screen, select:
- The B tab (= Braking), the 4th
- The car you want to use (short click to scroll through them, long click to select the one you want)
Note: Selecting the car results in the color of its action bar changing from blue to red.

A) Mode 1 (Accelerometer + GPS)
- 1) Stabilize the car at a real speed (GPS speed displayed at the top of the Perfs screen) 5 km/h (3 mph) higher than the selected start speed (START & blue bar)
- 2) Press the chrono located in the middle of the screen (WAIT & red bar & accelerometer calibration 1 s)
- 3) Wait for the GO! signal to brake (GO! & green bar)
- 4) Brake fully to a complete stop, PerfectPower automatically starts the measurement when the selected start speed is reached (RUNNING… & white bar)
- 5) Once the complete stop is achieved, PerfectPower automatically stops the measurement (ENDED & blue bar)
- 6) A measurement report is then displayed in the lower part of the screen, which will give you the essential information of your measurement (braking distance). Once read, press the chrono, PerfectPower will re-initialize for a new measurement (START & blue bar)
IMPORTANT: You must remain well stabilized at the same speed (as much as possible) during the second that the accelerometer calibration lasts (WAIT & red bar), otherwise the measurement will be false! What you must avoid in all cases is to start braking before the end of this accelerometer calibration phase!
B) Mode 2 (GPS only)
- 1) Stabilize the car at a real speed (GPS speed displayed at the top of the Perfs screen) 5 km/h (3 mph) higher than the selected start speed (START & blue bar)
- 2) Press the chrono located in the middle of the screen (GO! & green bar)
- 3) Brake fully to a complete stop, PerfectPower automatically starts the measurement when the selected start speed is reached (RUNNING… & white bar)
- 4) Once the complete stop is achieved, PerfectPower automatically stops the measurement (ENDED & blue bar)
- 5) A measurement report is then displayed in the lower part of the screen, which will give you the essential information of your measurement (braking distance). Once read, press the chrono, PerfectPower will re-initialize for a new measurement (START & blue bar)
5) Speed
Go to the Perfs screen (the home screen), and at the very top of the screen, select:
- The S tab (= Speed), the 5th
- The car you want to use (short click to scroll through them, long click to select the one you want)
Note: Selecting the car results in the color of its action bar changing from blue to red.
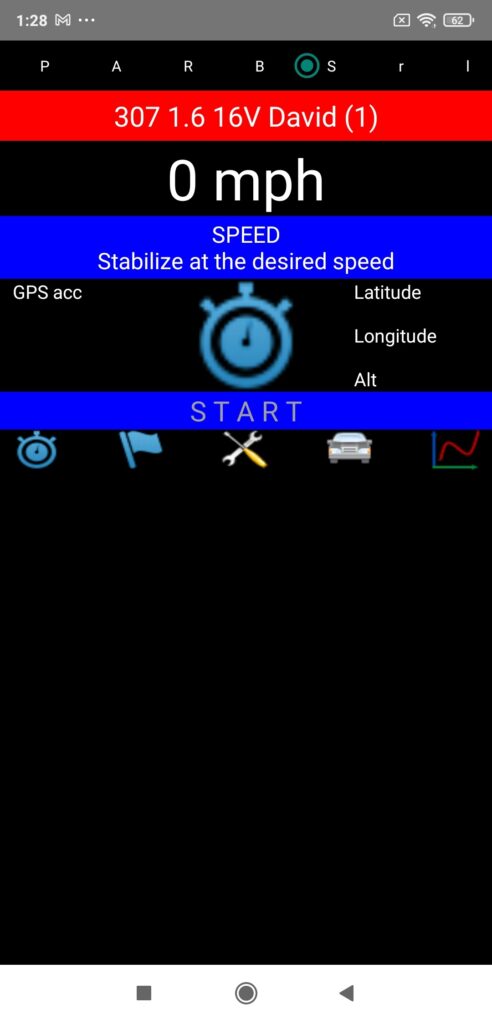
Prior note: This function actually allows you to perform 3 types of measurement: max speed measurement, speedometer calibration, or manual rev calibration.
- 1) Launch your car at full speed (max speed measurement) or stabilize it at the desired speedometer speed (speedometer calibration) or at the desired calibration rev on the desired gear (manual rev calibration) (START & blue bar)
- 2) Press the chrono located in the middle of the screen to start the measurement (RUNNING… & white bar)
- 3) Remain well stabilized at the desired speed or rev for 3 s, after which PerfectPower will automatically stop the measurement (ENDED & blue bar)
- 4) A measurement report is then displayed in the lower part of the screen, which will give you the average real speed (GPS) calculated over the 3 s of the measurement. Once read, press the chrono, PerfectPower will re-initialize for a new measurement (START & blue bar)
WARNING: This kind of measurement is not saved in memory: it will therefore be necessary to think as soon as the measurement is finished either to memorize the results (you can for example write them down on a sheet), or to take a screenshot.
6) Rev calibration
Go to the Perfs screen (the home screen), and at the very top of the screen, select:
- The r tab (= Rev calibration), the 6th
- The car you want to use (short click to scroll through them, long click to select the one you want)
Note: Selecting the car results in the color of its action bar changing from blue to red.

- 1) Stabilize the car at the selected calibration rev (3000 rpm by default) on the gear selected for power measurements (2nd or 3rd) (START & blue bar)
- 2) Press the chrono located in the middle of the screen to start the measurement (RUNNING… & white bar)
- 3) Remain well stabilized at the selected calibration rev for 3 s, after which PerfectPower will automatically stop the measurement (ENDED & blue bar)
- 4) A measurement report is then displayed in the lower part of the screen, which will give you a series of information calculated over the 3 s of the measurement, including of course the calculated gear ratio.
If you are satisfied with your rev calibration, then press the chrono (START & blue bar) then select the P tab (= Power): you are then ready to perform your power measurements!
On the other hand, if you are not (poor stabilization of the rev during the 3 s of the measurement), simply press the chrono (START & blue bar) then redo another one immediately, making sure to stabilize better.
WARNING: The gear ratio calculated following a rev calibration is systematically saved in memory, and it therefore “overwrites” the old value that was there: you will therefore have to think carefully if you are not satisfied with your rev calibration or to redo another one immediately, or to put back in the Car sheet the old value that was there!
7) Losses measurement
Go to the Perfs screen (the home screen), and at the very top of the screen, select:
- The l tab (= Losses measurement), the 7th
- The car you want to use (short click to scroll through them, long click to select the one you want)
Note: Selecting the car results in the color of its action bar changing from blue to red.

- 1) Stabilize the car at a real speed (GPS speed displayed at the top of the Perfs screen) 5 km/h (3 mph) higher than the selected start speed (START & blue bar)
- 2) Press the chrono located in the middle of the screen (GO! & green bar)
- 3) Freewheel by disengaging (manual gearbox) or by selecting “Neutral” (automatic gearbox, and if possible!) then let the car slow down, PerfectPower automatically starts the measurement when the selected start speed is reached (RUNNING… & white bar)
- 4) Once the selected losses measurement duration has been achieved (min 5 s and max 15 s), PerfectPower automatically stops the measurement (ENDED & blue bar)
- 5) A measurement report is then displayed in the lower part of the screen, which will give you the information of your measurement. Once read, press the chrono, PerfectPower will re-initialize for a new measurement (START & blue bar)
WARNING: This kind of measurement is not saved in memory: it will therefore be necessary to think as soon as the measurement is finished either to memorize the results (you can for example write them down on a sheet), or to take a screenshot.
Annex – The measure report / Warnings Codes
At the end of each measurement (regardless of its type), PerfectPower provides you with a measure report in the lower part of the screen that you can scroll by sliding your finger over it. This report will reveal the essential results of your measurement according to its type, and for power and accelerations measurements, the number of warnings on a series of 10 points summarizing:
- The quality of your compliance with the complete stop during the specific calibration (w1)
- The quality of the mounting of your phone (rigidity -w1-, vibrations -w2-, position -w3, w4, w5-)
- The stability of your phone during the measurement (angular displacements -w6, w7, w8-, depending both on the quality of the mounting of your phone -rigidity- and that of your measurement road -profile and condition-)
- The proper working of your GPS receiver (w9)
- The accuracy of GPS reception (w10)
You must take into account the indications given in this measure report to check or improve the quality of your measurements if necessary. If the number of warnings is regularly between 0 and 2, then the measurements are of very good quality. That said, don’t worry if the number of warnings exceeds 2, because the extreme efficiency of PerfectPower’s correction algorithms means that very often, 2, 3, 4, or even 5 warnings may have no consequencies: it all depends on the type of warning and the level at which the critical threshold is exceeded!
It should be noted that each warning has a degree reflecting the level of overrun of the critical threshold, from 0 (= below the critical threshold ==> no warning) to 3 (= extreme overrun of the critical threshold), even if in reality the majority of the warnings have only two levels (0 and 1): only warnings 1 and 10 have more.
Here is the list of the 10 warnings with their different degrees:
- Warning 1: Mounting of the phone (no movement) and complete stop during the specific calibration (0 = OK – 1 = slight movement – 2 = net movement ==> switch to Error 1)
- Warning 2: Vibration level (0 = OK – 1 = imperfect)
- Warning 3: Position of the phone around the car X axis (0 = OK – 1 = imperfect)
- Warning 4: Position of the phone around the car Y axis (0 = OK – 1 = imperfect)
- Warning 5: Position of the phone around the car Z axis (0 = OK – 1 = imperfect)
- Warning 6: Stability of the phone around its X axis (0 = OK – 1 = imperfect)
- Warning 7: Stability of the phone around its Y axis (0 = OK – 1 = imperfect)
- Warning 8: Stability of the phone around its Z axis (0 = OK – 1 = imperfect)
- Warning 9: GPS receiver working (0 = OK – 1 = not working)
- Warning 10: Accuracy of GPS reception (0 = good – 1 = average – 2 = bad – 3 = no GPS reception following warning 9)
In addition, PerfectPower saves in memory the warnings of each measurement with their degree, and restores them in the results sheet in the form of a line of codes in a paragraph named “Warnings”: these codes from 0 to 3 correspond to the degree of each of the 10 warnings, listed in ascending order: warning 1, warning 2, warning 3, etc…
The interest of this line is to allow each user to re-view after measurement the eventual warnings obtained during the measurement with their degree, and then consult the guide to know in detail the type of error(s) made with its level of intensity, exactly like reading DTC (Data Trouble Codes) in an ECU (Engine Control Unit)!
Note 1: Be careful, because PerfectPower can reject the measurement if one of the following 3 rules is not respected:
- Error 1: Faulty mounting of the phone (too much movement), and/or failure to respect the complete stop during the specific calibration (WAIT & red bar)
- Error 2: Measurement duration < 3 s
- Error 3: Measurement start rev on selected gear not reached (power only)
In this case, it is not a measure report that is delivered to you, but a failure report that will give you the reason for this failure.
Note 2: However, for strictly pedagogical purposes, PerfectPower will NEVER reject a measurement actually launched, i.e. in “Running…” state and having started for at least 3 s: in other words, if it happens a real incident during the measurement (such as the phone falling from its support), PerfectPower will still validate the measurement, even though the results will be aberrant, the principle of measurements based on accelerometers requiring a maximum stability of the phone during the measurements… On the other hand, the measure report will notify you of the disaster, with a disastrous phone stability on the 3 axes (warnings 6, 7, and 8): it’s up to you to understand that the measurement is aberrant and to reject it!
As you can see, PerfectPower is really interactive and formative!