I) Configuring the application (Setup)
Go to the Setup screen (accessible by pressing the Setup icon -the 3rd, in the middle-).
You must perform all the desired settings (depending on the type of measurement) from top to bottom, i.e.:
- The choice of units / colors (all types of measurement)
- The choice of measurement mode (all types of measurement)
- The choice of power parameters (correction norm, weather conditions, losses calculation mode)
- The choice of performance simulation parameters (shift time)
- The choice of accelerations parameters (end speed, type of measurement stop)
- The choice of runs flying start parameters (gear engaged, start and end speed)
- The choice of braking parameters (start speed)
- The choice of rev calibration parameters (calibration rev)
- The choice of losses measurement parameters (start speed, measurement duration)
All the necessary explanations are already given in the application, you just have to follow them. If these are sufficient for you, you can move on to chapter II. Otherwise, details are given to you below.
0) Global
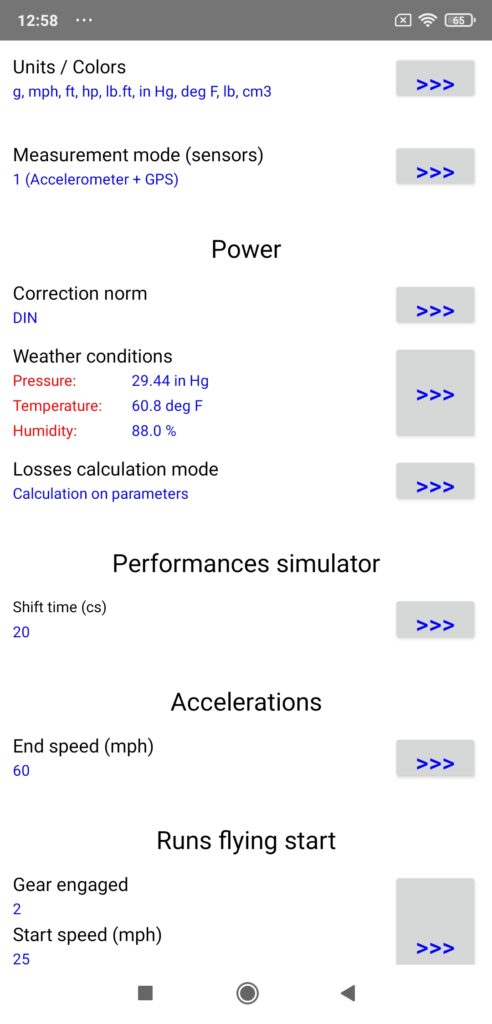
A) Units / Colors
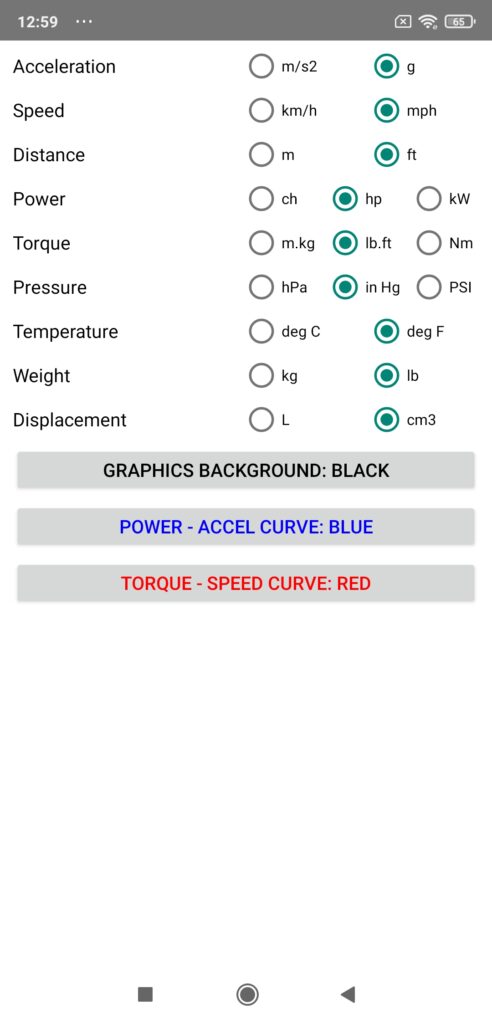
Press Units/Colors. A list of 9 physical quantities is displayed, for each of them you must choose its unit (metric or imperial in general), by selecting the desired unit. Below these 9 physical quantities, 3 buttons are available to you to choose the color of the background (black or white) and the power & torque and acceleration & speed curves (white / red / green / blue) of the power and accelerations graphs. Press these buttons until the desired color is selected. Once all units/colors have been chosen, return to the Setup screen by pressing the BACK button.
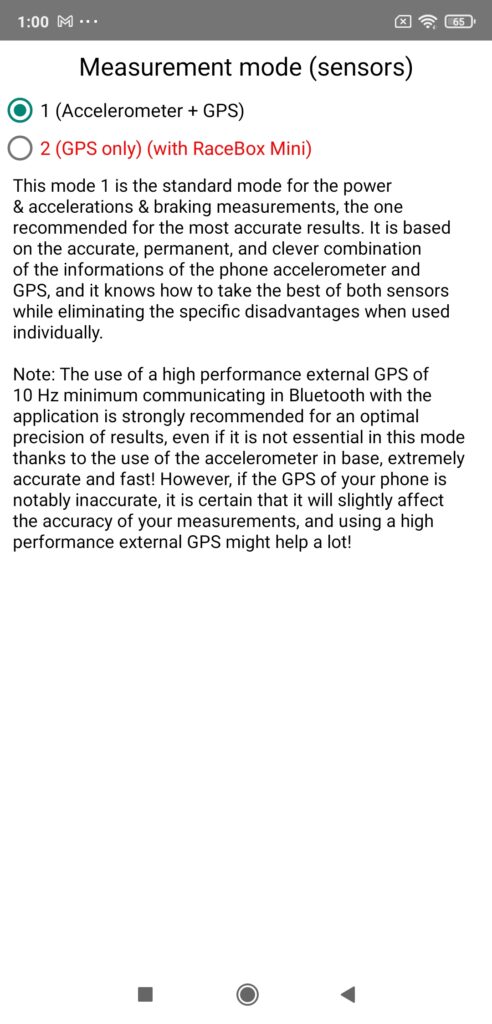
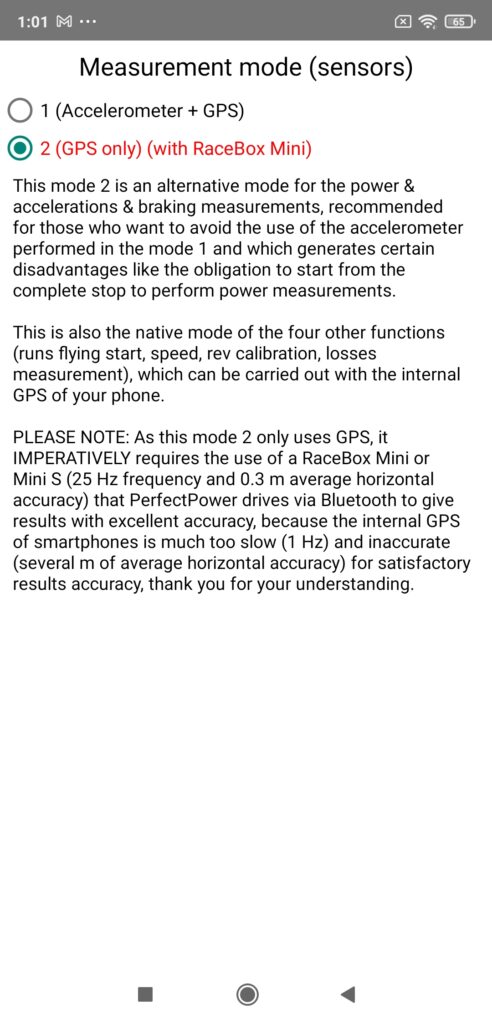
B) Measurement mode (sensors)
Press Measurement mode, then choose your measurement mode from the two available (mode 1 = Accelerometer + GPS and mode 2 = GPS only). Indications are displayed on the screen to help you in your choice. Once the measurement mode has been chosen, return to the Setup screen by pressing the BACK button.
Note: You must not only have a RaceBox Mini or Micro to be able to use mode 2 (GPS only), but it must also be connected to PerfectPower to be able to select mode 2, otherwise this selection will be refused, thank you for your understanding! Instructions for connecting your RaceBox to PerfectPower can be found in Annex 2-1 (Using a RaceBox Mini or Micro).
IMPORTANT 1: The reference mode is mode 1 (Accelerometer + GPS), and it is also not only the default mode but also the only one usable with your phone alone (having an accelerometer and a GPS): indeed and as said just before, you must have a RaceBox Mini or Micro to be able to use mode 2 (GPS only), because it is the only all-public external GPS with an accuracy (0.3 m average horizontal accuracy) and a frequency (25 Hz) sufficient to offer results having an accuracy at the level of the very high PerfectPower standards (defined HERE) and those obtained in mode 1… thank you for your understanding!
The only interest of mode 2 (GPS only) is to simplify the measurement procedure by allowing:
- The performance of power measurements on a rolling start
- The removal of the accelerometer calibration phase while driving for braking measurements
- The complete release of the phone from any mounting requirements
IMPORTANT 2: In reality, of the 7 types of measurements that can be performed with PerfectPower (power, accelerations, runs flying start, braking, speed, rev calibration, and losses measurement), only 3 are impacted by the choice of measurement mode: power, accelerations, and braking. Indeed, the other 4 are natively performed with only GPS (whether it is the phone’s internal GPS or an external GPS), and therefore naturally work in mode 2 regardless of the measurement mode chosen.
To help you see things clearly, here is a summary table:
| Mode 1 (Accéléromètre + GPS) | Mode 2 (GPS only) | |
| 1) Power | Accelerometer + GPS | GPS |
| 2) Accelerations | Accelerometer + GPS | GPS |
| 3) Runs flying start | GPS | GPS |
| 4) Braking | Accelerometer + GPS | GPS |
| 5) Speed | GPS | GPS |
| 6) Rev calibration | GPS | GPS |
| 7) Losses measurement | GPS | GPS |
| GPS source | internal or external | external AND only RaceBox |
IMPORTANT 3: Here are very exactly the accuracy levels that you will get for the 4 main measurements in each of the 3 possible mode / hardware configurations:
| Mode 1 & Internal GPS | Mode 1 & External GPS | Mode 2 & RaceBox | |
| Equipment required | Your ONLY phone | Your phone and a GPS of 10 Hz mini | Your phone and a RaceBox |
| Hardware performance | Accelerometer 100 Hz + GPS 1 Hz | Accelerometer 100 Hz + GPS 10 Hz mini | GPS 25 Hz |
| 1) Power | +- 1% | +- 0.5% | +- 0.5% |
| 2) Accelerations | +- 0.5% | +- 0.25% | +- 0.25% |
| 3) Runs flying start | Pessimistic 3% +- 2% | +- 1% | +- 0.3% |
| 4) Braking | +- 0.5% | +- 0.25% | +- 0.25% |
Useful details:
- All the measurement accuracies given in this table have been calculated theoretically AND verified in practice (all measurement conditions for mode 1… but on a clear road and in good weather for mode 2 -sensitivity of the GPS to the physical environment and weather conditions-)!
- The accuracy of the runs flynig start measurements was established on measurements of amplitude 40 km/h (25 mph) (it would be better on measurements of higher amplitude)
A good synthesis of this table would be the following:
- Mode 1 & Internal GPS = BEST PRICE / ACCURACY RATIO!
- Mode 1 & External GPS = THE MOST EFFICIENT!
- Mode 2 & RaceBox = THE MOST CONVENIENT!
1) Power
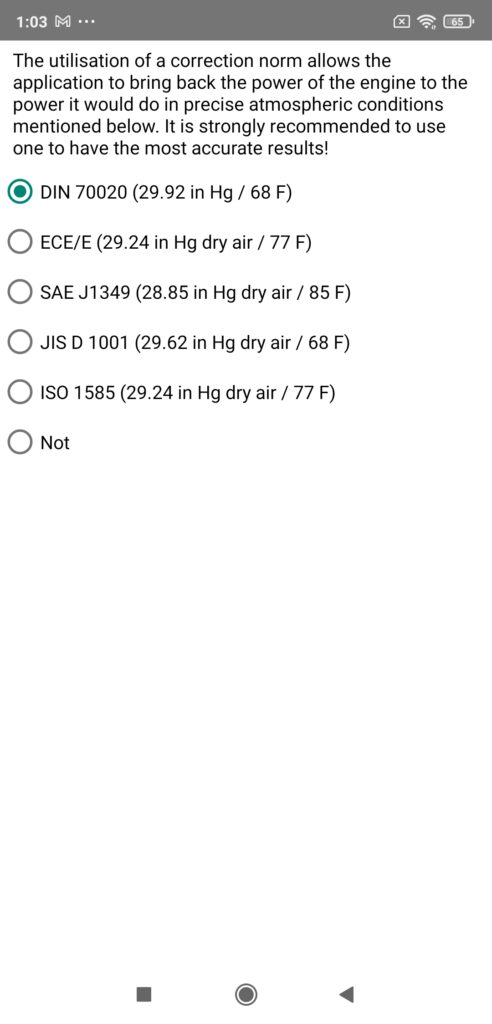
A) Correction norm
Press Correction norm, then choose your correction norm from the five offered (although you can choose not to use one). Indications are displayed on the screen to help you in your choice. Once the correction norm has been chosen, return to the Setup screen by pressing the BACK button.
Note 1: The three major roles of the correction norm are:
- Define a reference weather standard
- “Bring back” the power and torque results measured for a given engine to those that this engine would deliver in this reference weather standard using a correction formula
- Allow equalization of measurement results whatever the weather conditions (and therefore also the location) at the time of measurements!
Note 2: NEVER neglect the influence of weather conditions -and therefore the importance of the correction norm- on the results! This is a typical mistake among beginners or non-specialist amateurs. Conversely, you will NEVER see a professional or a specialist amateur make this mistake!
Note 3: Of course, the efficiency of this correction norm can not be perfect, especially if you make your measurements in extreme climatic conditions, especially since (paradoxically… apparently!) your car is recent, because the ECUs more and more modify the engine performances according to the weather conditions, which no standardized correction formula can anticipate! The best way to limit this phenomenon is obviously to make your measurements in weather conditions relatively close to those of the standard used, and the designers of the standards themselves guarantee a good efficiency of their standard in a temperature range of +- 10° C & 18° F around the reference temperature.
Note 4: It is therefore strongly recommended to choose one for the most reliable results possible, and PerfectPower recommends the DIN norm which has proven its astonishing efficiency both during two serious scientific studies (California and Brazil) and over years and thousands of measurements from the PerfectPower Lab!
B) Weather conditions
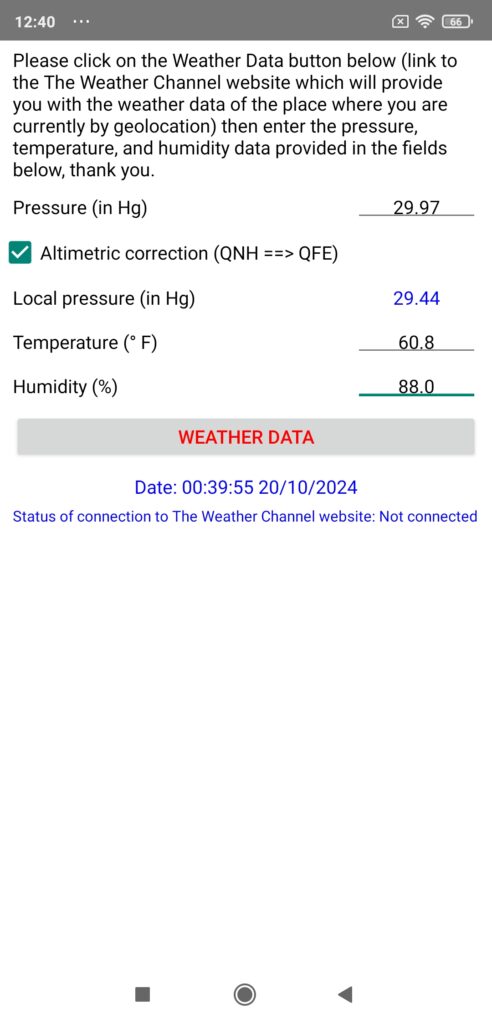
Press Weather conditions, then enter the current weather conditions of your measurement location in the 3 dedicated weather fields: Pressure, Temperature, and Humidity. Once the weather conditions have been entered, return to the Setup screen by pressing the BACK button.
Note 1: Entering the weather conditions is ESSENTIAL: indeed, these ones are not only necessary for the correction of the engine results made by the correction norm configured just before, but they are also necessary for the dynamic calculation of the air resistance during measurements!
Note 2: PerfectPower provides you with valuable assistance (function of manual recovery of weather data) by providing you with a link to The Weather Channel website which will provide you with weather data for where you are currently by geolocation: you just need to click on the Weather Data button located just below the 3 weather fields, read these 3 weather data (Pressure, Temperature, and Humidity) on The Weather Channel website, and finally enter them in the 3 weather fields after returning to the Weather screen, and that’s all!
Well, almost everything, because in this case you must also check the “Altimetric correction (QNH ==> QFE)” box, which will correct the pressure returned by The Weather Channel website and which is a standardized pressure at the sea level (named QNH), into a local pressure at the altitude where you are currently (named QFE), and which is obviously the one that PerfectPower must use for its calculations!
Note 3: For information, the pressure returned by all official weather stations worldwide is always a QNH by default, it is only a QFE when it is explicitly specified in the returned report with also the mention of the altitude of the station. Please remember this if you use a weather station other than that of the reference weather website The Weather Channel used by PerfectPower.
Note 4: Please note, it is necessary to wait approximately 10 s in the Perfs screen after opening the application (time to obtain a sufficiently accurate GPS signal) before going to this Weather screen to manually recover the weather data! Indeed, the GPS being cut off as soon as you exit the Perfs screen to save battery, the GPS information used for manual recovery of weather data is that recorded at the precise moment when you leave the Perfs screen to go to the Weather screen, and they only exist (and are reliable) from around 10 s after opening the application.
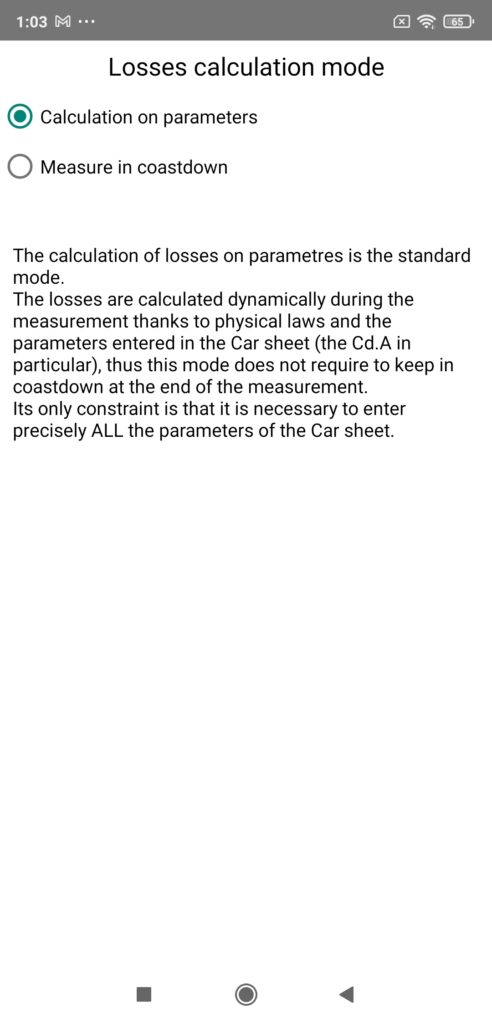
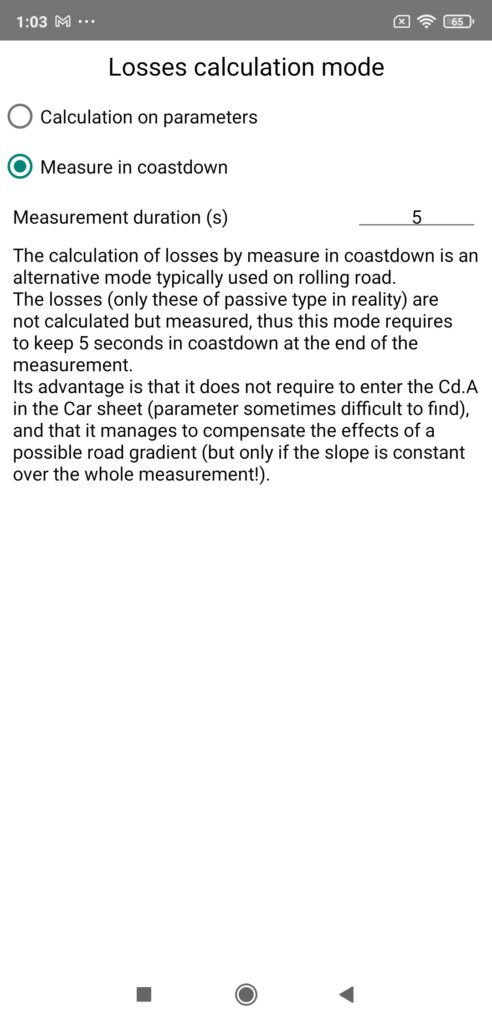
C) Losses calculation mode
Press Losses calculation mode, then choose the losses calculation mode you want to use from the two offered (Calculation on parameters and Measure in coastdown). Indications are displayed on the screen to help you in your choice. Once the losses calculation mode has been chosen, return to the Setup screen by pressing the BACK button.
Note 1: If you choose the losses calculation mode by measure in coastdown, you will also need to configure the losses measurement duration (min 5 s and max 15 s).
Note 2: Although the essential indications for choosing the losses calculation mode are displayed on the screen in the application, additional information is given to you in this guide, because this choice has a real importance in the reliability of the engine results…
Mode 1: Calculation of losses on parameters
This mode is the standard mode, the one which presents the best compromise reliability of results / ease of use.
In this mode, the calculation of losses is done by dynamic calculation during the measurement based on physical laws and the parameters entered in the Car sheet (in particular the Cd.A and the weight). It comes highly recommended by PerfectPower!
The advantages of this mode are four:
- The reliability of the engine results remains exceptional for the overwhelming majority of cars (unless you have a Formula 1 -and even then-, your results will remain extremely reliable!)
- It does not require freewheeling at the end of the measurement
- It does not require a road with a constant slope
- It allows you to measure 100% of cars (manual gearboxes AND automatic gearboxes)
For two disadvantages:
- It requires the averaging of measurements in both directions of the road if this one is not perfectly flat (almost always the case in practice…)
- It requires that you accurately enter ALL the parameters of the Car sheet (in particular the Cd.A and the weight)
Mode 2: Calculation of losses by measure in coastdown
This mode is an alternative mode typically used on rolling road.
In this mode, the losses (only those of “free” type in reality) are not calculated but measured in a freewheeling phase to be carried out once the measurement itself is completed, by freewheeling (by disengaging) for a time to also configure (“Measurement duration (s)” field, min 5 s and max 15 s).
The advantages of this mode are three:
- The reliability of the engine results is maximum for all cars… measurable in this mode! (automatic gearboxes excluded…)
- It does not require configuring the Cd.A in the Car sheet (parameter sometimes difficult to access)
- It compensates for the effects of a possible road slope… but only if this slope is constant over the entire measurement!
For also three disadvantages:
- If the road is sloping, it requires that this slope be constant over the entire measurement zone + the entire freewheel zone (in other words, NEVER the case in practice…)
- The majority of cars with an automatic gearbox are simply immeasurable in this mode (impossibility of freewheeling…)
- It requires remaining 5 to 15 s (according to configured duration) freewheeling at the end of the measurement, which requires a certain length of road…
Synthesis: What is the best mode?
Of course, everyone can use the mode that seems best suited to their situation, taking into account the report of the advantages and disadvantages of each of these two modes presented above, but it is still generally more interesting to use mode 1!
Why? Already from a strictly objective point of view: 4 advantages / 2 disadvantages for mode 1, against 3 / 3 for mode 2… But also and above all because mode 1 is more universal and homogeneous than mode 2: indeed, mode 1 allows to measure 100% of the cars produced on the planet while mode 2 immediately excludes cars with automatic gearbox, and also mode 1 is clearly much easier to implement on open roads than mode 2!
But that’s not all: even in terms of accuracy of engine results which I remind you is the ABSOLUTE PRIORITY of PerfectPower since its creation and its very reason for being, mode 1 remains exceptionally accurate for the overwhelming majority -if not all- of cars, both thanks to the perfection of the losses calculation in PerfectPower (better than that of any roller or hub dyno in the world…), and thanks to also the moderate speeds practiced with PerfectPower (measurements in 2nd or 3rd gear) allowing the losses calculation to maintain exceptional accuracy (high speeds such as those practiced on a roller dyno -measurements typically in 4th or 5th gear- generate strong pneumatic / road or -especially- rollers friction, which inevitably reduces the accuracy of the losses calculation…).
Once that said, what could seem like the only small advantage of mode 2 over mode 1 in terms of accuracy of engine results disappears, and when we now look at the real advantages of mode 1 over mode 2 in terms of universality and homogeneity, we see very clearly why mode 1 is generally more interesting to use!
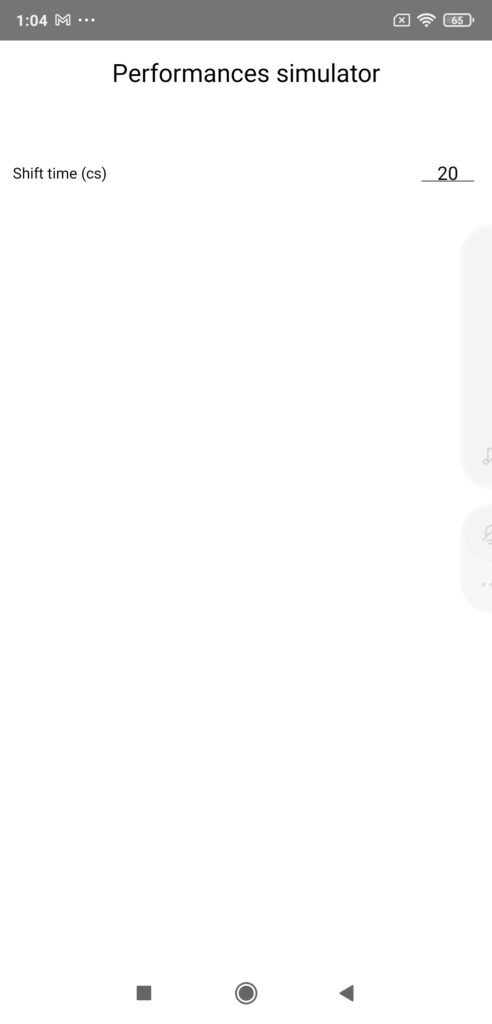
2) Performance Simulator
Press Performance simulator, then choose the shift time that you consider to be the most realistic when driving your car. Once this time has been chosen, return to the Setup screen by pressing the BACK button.
Note 1: The configuration of the runs flying start in the performance simulator is actually done in the “Runs flying start” menu a little lower.
Note 2: Other settings will be added in future versions (slope angle, presence of wind, dry/wet ground, etc…).
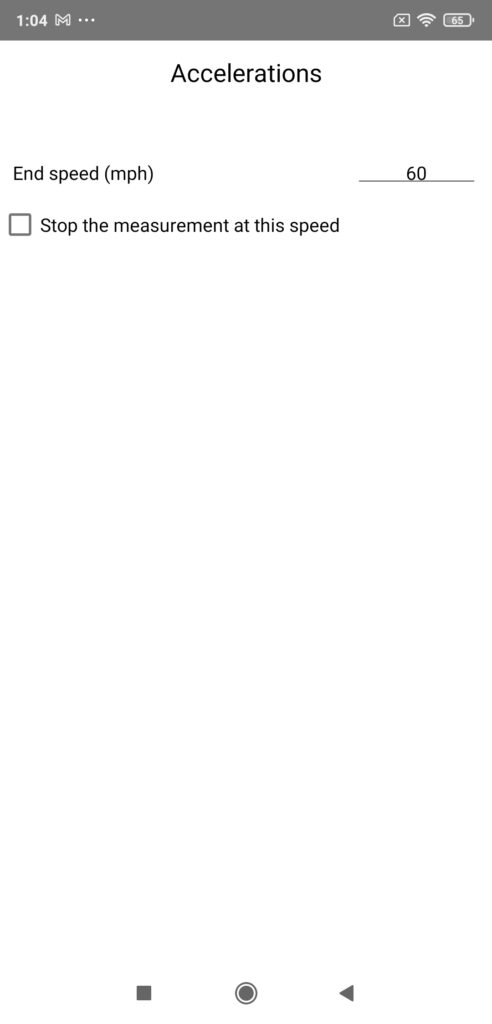
3) Accelerations
Press Accelerations, then choose:
- The end speed of your acceleration measurements
- To activate or not the measurement stop mode at this speed
Once this setting has been made, return to the Setup screen by pressing the BACK button.
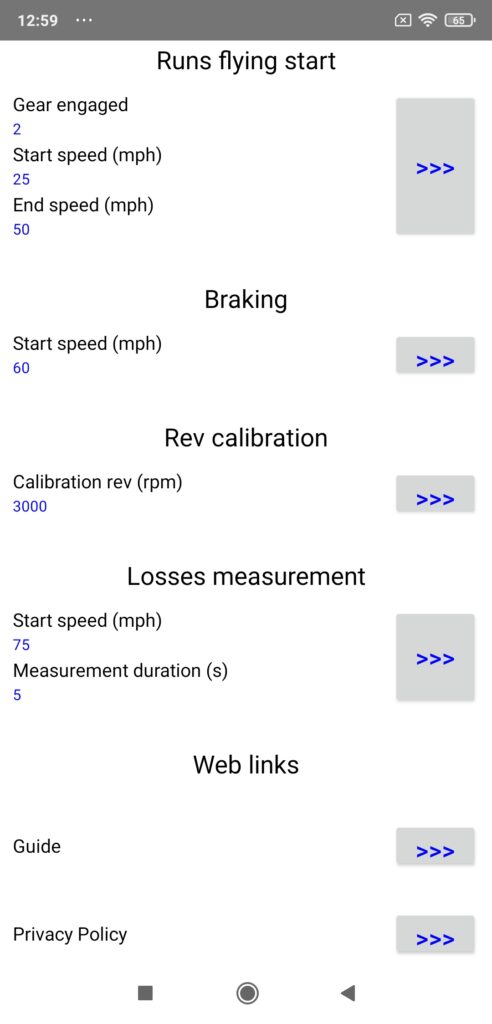
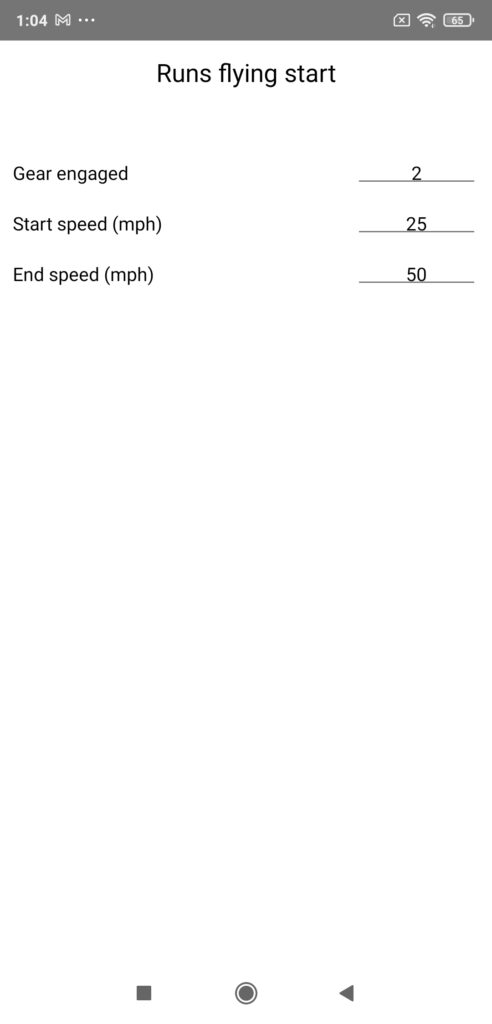
4) Runs flying start
Press Runs flying start, then choose:
- The gear engaged
- The start speed
- The end speed
Once this setting has been made, return to the Setup screen by pressing the BACK button.
Note 1: It is of course the gear engaged at the start of the run which must be selected. For example, if you want to do a 40-100 mph in 2/3/4, you must enter the gear 2.
Note 2: In reality, these three runs flying start parameters are also used by… the performance simulator!
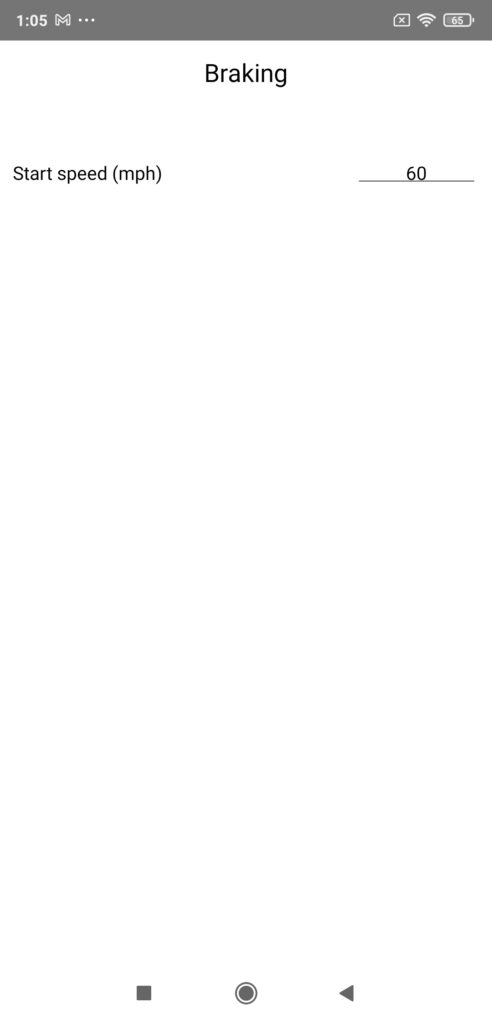
5) Braking
Press Braking, then choose the braking start speed. Once this speed has been chosen, return to the Setup screen by pressing the BACK button.
6) Rev calibration
Press Rev calibration, then choose the calibration rev for power measurements. Once this rev has been chosen, return to the Setup screen by pressing the BACK button.
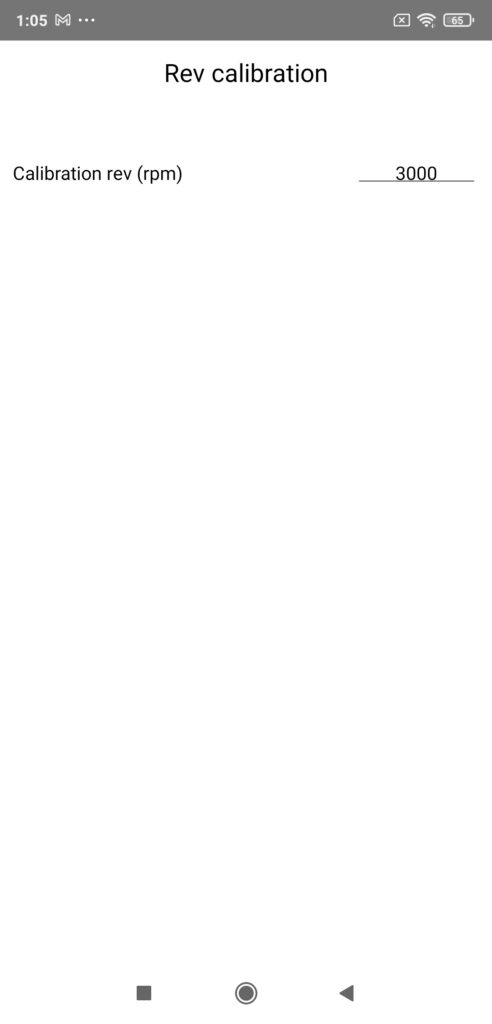
Note 1: Rev calibration is a procedure that allows you to avoid setting the gear and final ratios (data by far the most difficult to find) by simply calculating them “live” (while driving on the road). For information, this procedure is systematically used on chassis dynamometer.
Note 2: When should you use this procedure? In two specific cases:
- You can’t find your car’s gear and/or final ratios (or you don’t want to “bother” looking for them)
- You have verified on the road a difference between the actual speeds measured and the theoretical speeds calculated (displayed in the Calculation of the gear ratios screen accessible from any Car sheet) greater than 2%, the tolerance allowed
Note 3: How to perform it? By following the explanations given in chapter IV-6 which is dedicated to it!
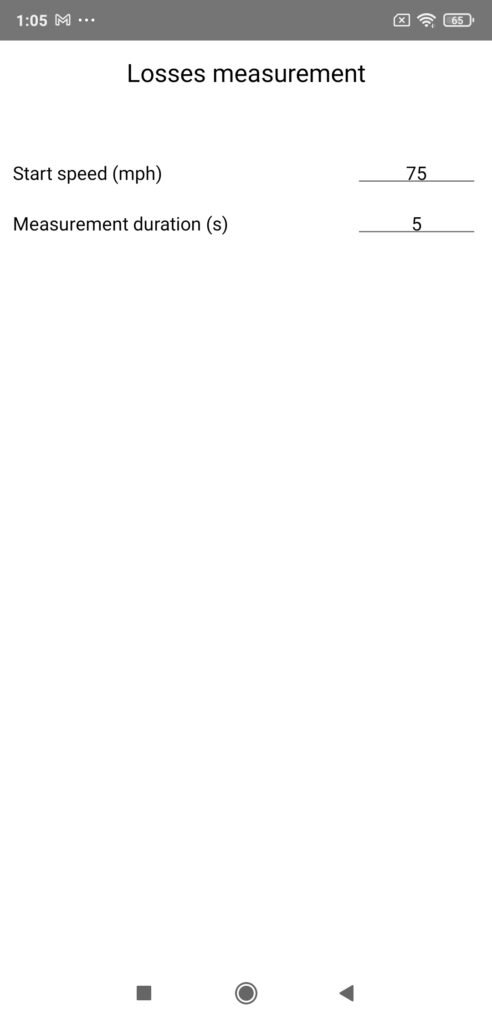
7) Losses measurement
Press Losses measurement, then choose:
- The start speed of losses measurement
- The duration of losses measurement
Once this setting has been made, return to the Setup screen by pressing the BACK button.